
Growing Mushrooms on Your Balcony or Terrace: A Complete Practical Guide
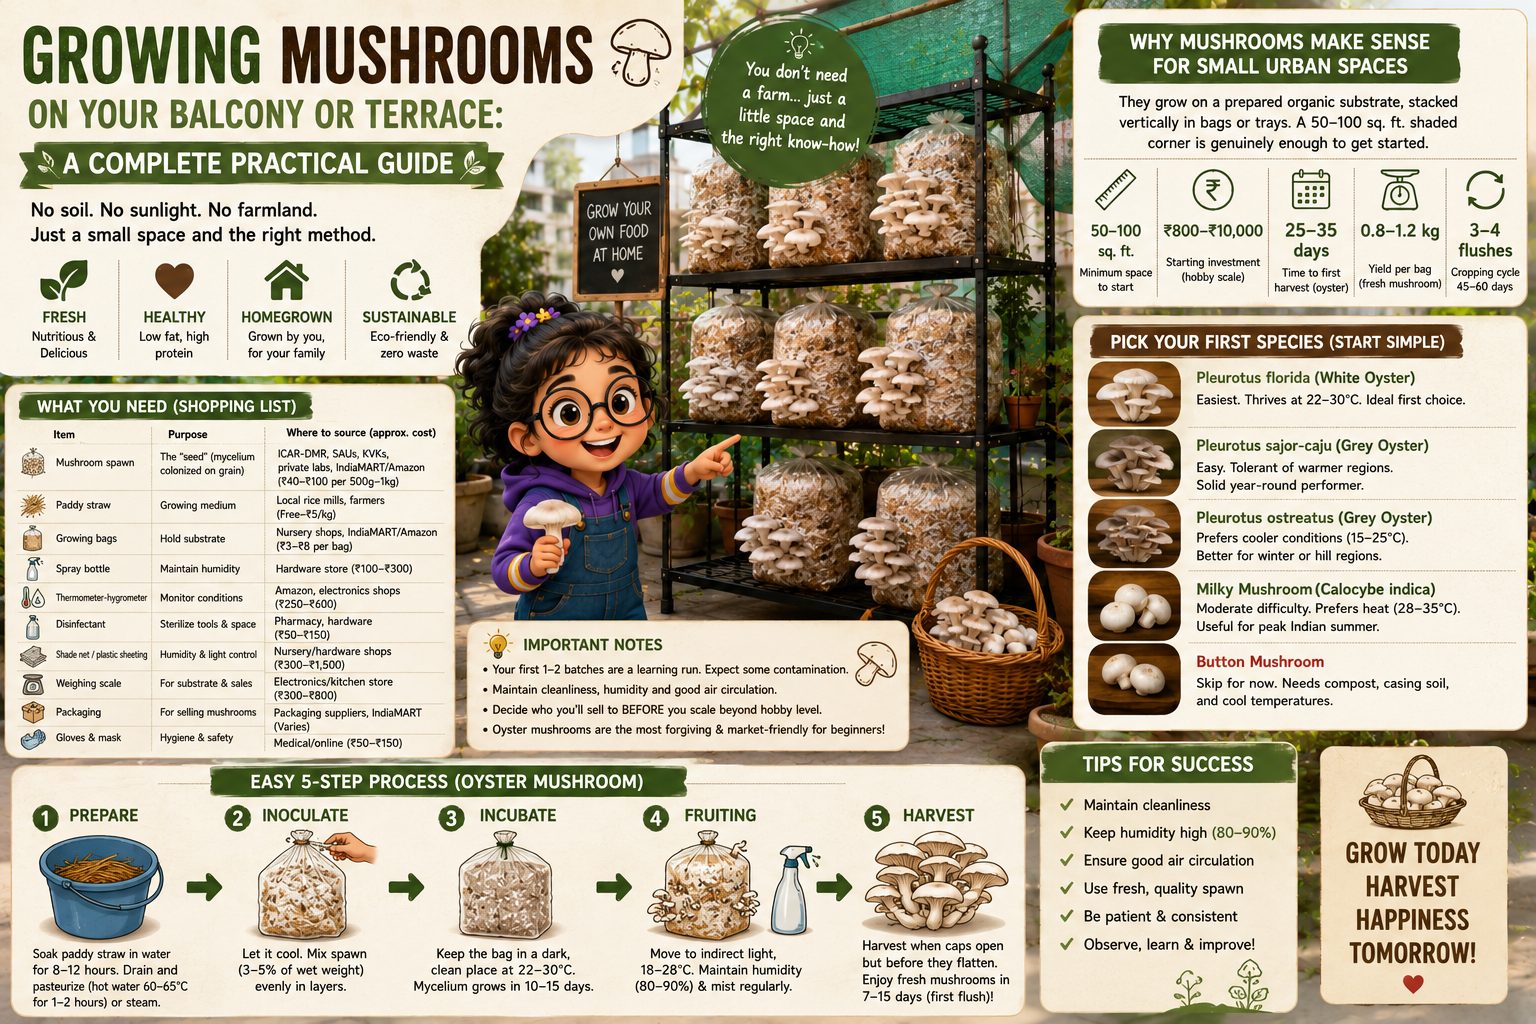
If you've got a shaded corner of a balcony, a covered terrace, or even a spare storeroom, you have enough space to grow mushrooms — no soil, no sunlight, and no farmland required. This guide walks through the entire journey: what to buy, how to set up your space, the actual cultivation process, day-to-day care, harvesting, and — just as important — how to actually sell what you grow.
We'll use oyster mushroom (Pleurotus species) as the working example throughout, because it's the most forgiving, fastest-growing, and most commercially familiar mushroom for a first-time small-space grower in India. You can go from spawning to first harvest in about 25–35 days.
Why Mushrooms Make Sense for Small Urban Spaces
Most vegetables need soil, sunlight, and horizontal space — mushrooms need none of that. They grow on a prepared organic substrate, stacked vertically in bags or trays. A 50–100 sq. ft. shaded corner is genuinely enough to get started.
Here's what a realistic starting point looks like:
Parameter Typical Range Minimum space to start 50–100 sq. ft. Starting investment (hobby scale) ₹800 – ₹10,000 Time to first harvest (oyster) 25–35 days from spawning Yield per bag ~0.8–1.2 kg fresh mushroom, biological efficiency varies Cropping cycle per bag 3–4 flushes over 45–60 daysTreat these as reference ranges, not guarantees — spawn quality, strain, and your local climate will all move these numbers.
Picking Your First Species
Don't optimize for the fanciest or most expensive mushroom on your first try. Optimize for forgiveness: wide tolerance for temperature and humidity swings, a fast cycle, and a market that already recognizes it.
- Pleurotus florida (white oyster) — easiest, thrives at 22–30°C, ideal first choice for most of India's warm climate.
- Pleurotus sajor-caju (grey oyster) — easy, tolerant of warmer regions, solid year-round performer.
- Pleurotus ostreatus (grey oyster) — prefers cooler conditions (15–25°C), better suited to winter months or hill regions.
- Milky mushroom (Calocybe indica) — moderate difficulty, actually prefers heat (28–35°C), useful for peak Indian summer when oyster struggles.
- Button mushroom — skip this for a balcony start. It needs compost, casing soil, and cool temperatures that are hard to maintain in an uncontrolled space.
Recommendation: start with P. florida or P. sajor-caju. Both are widely available, tolerant of balcony conditions, and easy to sell since most Indian buyers already know them.
Go in with realistic expectations — your first 1–2 batches are a learning run. Expect some contamination while you calibrate hygiene and humidity. And decide who you're going to sell to before you scale past a hobby batch — logistics matter as much as technique.
Procurement: What to Buy and Where
Here's your shopping list:
Item Purpose Where to Source Approx. Cost Mushroom spawn The "seed" — mycelium colonized on grain ICAR-Directorate of Mushroom Research (Solan), state agricultural university units, KVKs, private spawn labs on IndiaMART/Amazon ₹40–₹100 per 500g–1kg Paddy straw Growing medium Local rice mills, farmers, agri-waste dealers Often free–₹5/kg Growing bags Perforated bags to hold substrate Nursery shops, IndiaMART, Amazon ₹3–₹8/bag Spray bottle Daily humidity maintenance Any hardware store ₹100–₹300 Thermometer-hygrometer Monitoring conditions Amazon, electronics shops ₹250–₹600 Disinfectant Sterilizing tools and space Pharmacy, hardware store ₹50–₹150 Shade net / plastic sheeting Humidity retention, light control Nursery/hardware shops ₹300–₹1,500 Weighing scale Substrate ratios, later for sales Electronics/kitchen store ₹300–₹800 Packaging Selling harvested mushrooms Packaging suppliers, IndiaMART ₹1–₹3/unitSpawn is the purchase that matters most
Spawn quality sets the ceiling on your entire crop — no amount of good technique fixes weak spawn. Buy only from a supplier who can tell you the species, strain, production date, and recommended temperature range for that specific batch.
- Best sources: ICAR-DMR Solan and its regional centres, state agricultural university mushroom units, local KVKs, or established private spawn labs with a track record.
- Check on arrival: even, white, cottony growth through the grain, a fresh mushroomy smell (not sour or ammonia-like), and no green/black/yellow patches.
- Shelf life: use within 2 months of packing; refrigerate at 4–15°C if storing, never leave it in a hot room or direct sun.
- Buy 10–20% extra for your first batch — some discard rate while learning is normal.
Substrate
Paddy straw is the cheapest, most available option across most of India. Wheat straw, sugarcane bagasse, or sawdust blends work if straw isn't accessible — ask your spawn supplier what their strain performs best on. For a first 10–20 bag batch, 25–40 kg of dry straw is a reasonable quantity.
Setting Up Your Growing Space
What the space needs
Factor Requirement Balcony/Terrace Fix Light Low, indirect North-facing balcony ideal; use a 50–75% shade net otherwise Temperature 20–30°C Avoid west-facing walls in summer; shade heavily or move indoors April–June Humidity 70–90% Enclose the area with plastic sheeting or a cheap grow tent; mist regularly Airflow Fresh exchange, no drafts Leave a vent gap — don't fully seal the enclosure Cleanliness Free of ants, mould, odours Keep away from compost bins or open drainsBuilding the layout
- Pick a shaded corner that avoids direct afternoon sun.
- Set up a simple multi-tier rack (bamboo, wood, or wire shelving) so bags can be stacked or hung vertically — this is what lets 50 sq. ft. hold 30–50+ bags.
- Loosely enclose three sides with plastic sheet or shade cloth, leaving one side vented for airflow.
- Keep a water tray or mister nearby if your climate runs dry (below ~60% ambient humidity).
- Put your thermometer-hygrometer at bag height, not at the top of the rack — you want readings that match what the mushrooms actually feel.
- Keep a separate "clean zone" for spawning and packing, away from the finished bags, to limit cross-contamination.
Adjusting by season
- Summer (April–June): heat is your main enemy. Mist more often, drape wet jute cloth over bags, and shift to the coolest indoor spot during peak heat.
- Monsoon (July–September): humidity is already high — ease off misting and watch closely for contamination given the ambient mould load.
- Winter (Nov–Feb): cooler temps suit grey oyster well; in colder regions, move bags indoors overnight.
Preparing the Substrate
- Chop dry straw into 4–6 cm pieces — smaller pieces pack tighter and colonize faster.
- Soak in clean water for 12–16 hours, or better, do the hot-water treatment below.
- Hot-water treatment (recommended): submerge straw in water at 60–65°C for 60–90 minutes. This is a home-scale substitute for steam sterilization and meaningfully cuts contamination risk without needing an autoclave.
- Drain thoroughly — squeeze a handful; a few drops should fall, not a stream. Over-wet substrate is the most common beginner mistake.
- Spread on a clean tarp in the shade to cool and surface-dry before spawning. Spawning into hot straw kills the mycelium.
Optional: adding wheat or rice bran at 10–15% of substrate weight can boost yield, but raises contamination risk slightly. Skip it for your first couple of batches until your hygiene routine is solid.
Hygiene rules while prepping: wash hands and sanitize tools before use, work away from soil or drains, and never reuse containers from a contaminated batch without a proper wash.
Spawning the Bags
- Take a clean, perforated bag (roughly 45 x 30 cm) or a lined tray.
- Lay a 5 cm layer of prepared moist straw at the bottom.
- Scatter a handful of spawn evenly across the surface.
- Repeat — straw, spawn, straw, spawn — 3–4 times, finishing with a straw layer on top.
- Press down firmly to remove air pockets, then tie the neck loosely.
- As a rough ratio: 200g of spawn covers about 2 bags this size.
- Label each bag with the spawning date and strain — you'll need this to track incubation and troubleshoot later.
Once filled, make 8–12 small holes (~1 cm) around each bag with a sterilized nail or skewer, for gas exchange during incubation.
Incubation: The Spawn Run
Parameter Target Temperature 22–28°C, no light needed Humidity Moderate — the sealed bag mostly self-regulates Duration 12–20 days, until fully white with myceliumCheck daily. Healthy bags turn uniformly white. Any green, black, or bright yellow/orange patches mean contamination — pull that bag out immediately to protect the rest. A sour or ammonia smell (instead of a pleasant, earthy one) is another red flag. Try not to open bags unnecessarily during this stage — every opening is a small contamination risk.
Fruiting: Where the Mushrooms Actually Appear
Once a bag is fully colonized (all white), move it to your fruiting rack in indirect light. Cut 3–5 small X-shaped slits, about 3–4 cm each, spread around the bag — this is where the mushrooms emerge. If pinning doesn't start within a few days, a brief "shock" — sudden light or a cooler misting — often helps trigger it.
Ongoing conditions during fruiting
Parameter Target How to Hit It Temperature 20–30°C Shade, ventilate, or move indoors during extreme heat Humidity 80–95% Mist 2–4 times daily, more in dry weather Light Indirect, 8–12 hrs/day Diffuse daylight through a net or curtain is enough Airflow Gentle fresh exchange Keep a vent open — stale air causes long, thin stemsA daily routine that actually works
- Morning: check temperature/humidity readings, mist if the surface looks dry.
- Midday: quick visual scan for contamination or wilting pins.
- Evening: mist again if needed, note anything close to harvest for tomorrow.
- Weekly: clean the rack area, clear harvested-bag debris, check for ants near the setup.
Troubleshooting common problems
Symptom Likely Cause Fix Green/black mould patches Contamination from unsterile substrate or excess moisture Remove the bag, improve hygiene next batch Long, thin stems, small caps Poor ventilation Increase airflow Drying/cracking mushrooms Low humidity Mist more often Slimy, rotting patches Overwatering Reduce misting, check drainage holes No pinning after full colonization Insufficient light/humidity trigger Move to brighter spot, try a humidity "shock" Ants near bags Sugary residue, nearby waste Keep area clean, use a physical barrier instead of sprayHarvesting and Handling After Picking
When to harvest: caps have expanded and just begun curling at the edges — not still tightly cupped, and not fully flat and dropping spores. Early is safer than late.
How to harvest: twist and pull the whole cluster from the base (leaves less stub tissue to rot), or cut cleanly with a sharp knife — either works, as long as you remove the whole cluster without leaving decaying bits behind.
Multiple flushes: after the first harvest, rest the bag 7–10 days with reduced misting, then resume normal humidity for the next flush. Expect 3–4 flushes over 45–60 days, with the first two usually giving the best yield.
Post-harvest care:
- Don't wash before storage — trim the base and brush off debris instead. Washed mushrooms spoil faster.
- Store in a perforated container, not a sealed bag, to avoid sweating.
- Refrigerate at 2–4°C if not selling same-day — fresh oyster mushroom keeps about 3–5 days.
- Consider sun-drying or dehydrating unsold stock — dried mushroom keeps for months and can be sold as a separate, higher-margin product.
Selling: Where the Real Business Happens
This is the part that decides whether your mushroom farm is a hobby or an actual income stream.
Channels worth trying
Channel Effort Typical Price Notes Neighbours / society WhatsApp groups Low Retail Best starting point — zero commission, repeat buyers Local vegetable/organic vendors Low–Medium Slightly below retail Vendor takes a cut but buys in volume, repeatedly Restaurants / cloud kitchens Medium Wholesale, steady Bring a sample first — consistency matters more than price Farmers' markets Medium–High Retail, often premium Needs regular weekend commitment Instagram/WhatsApp storefront Medium Retail, premium possible Works well for an "urban farm to table" story Value-added products (dried, pickle, powder) Higher Premium Good outlet for surplus or imperfect harvestOn pricing
Fresh oyster mushroom commonly retails around ₹150–₹300/kg in Indian cities, though this varies a lot by city and season. Wholesale/vendor rates typically run 20–35% below that. Call a few local vendors and check what home-growers are charging on Instagram before you set your own price.
Packaging that builds trust
Use small perforated bags or paper punnets — 200–250g portions are an easy, sellable size. Add a simple label with your name, weight, and harvest date. It's a small thing, but it signals freshness and looks far more professional than a plain bag.
Building repeat demand
- Gift or heavily discount your first 1–2 harvests to neighbours and friends — word of mouth is your cheapest marketing.
- Start a WhatsApp broadcast list or Instagram page; post harvest-day photos consistently. "Harvested today" sells itself.
- Once your supply is predictable, offer a weekly or biweekly subscription box to 5–10 regular households.
- Keep a simple order log — even a notebook works — of who buys how much and how often, so you can plan next week's bag count.
Don't over-produce before you have buyers. A safe rule: secure informal commitments from 5–10 households or 1–2 vendors before scaling past your first 15–20 bags.
Does the Math Work?
Here's a rough model for a 20-bag cycle — treat it as a planning template, not a promise:
Item Approx. Cost Spawn (~20 bags) ₹800–₹1,200 Straw (30–40 kg) ₹0–₹300 Growing bags (20) ₹100–₹160 Disinfectant, consumables ₹100–₹200 Packaging ₹150–₹300 Total per cycle ≈ ₹1,150–₹2,160At a conservative 0.8–1 kg yield per bag across all flushes, 20 bags gives roughly 16–20 kg of mushroom per cycle. At a blended price of ~₹200/kg, that's around ₹3,200–₹4,000 in revenue per 45–60 day cycle — before counting your own time, which is really the main "cost" at this scale. Margins improve once your one-time setup costs (rack, thermometer, sprayer) are already paid off and don't repeat every batch.
Scaling Up When You're Ready
- Move from ad-hoc bags to a batch calendar — stagger spawning by 5–7 days across groups so harvests arrive steadily instead of all at once.
- Reinforce your rack or dedicate a small room once you pass ~50 bags; balcony space typically saturates around there.
- Once volume is consistent, look into FSSAI basic registration, generally required in India once you're selling food commercially, and build formal relationships with local grocers or hotels.
- Consider a second species — milky mushroom for the hot months — to keep production going through summer when oyster struggles.
- Keep a weekly cost/yield/sales log from cycle one. It's the record that makes you credible to suppliers, buyers, or anyone you approach for support later.
The Short Version
Getting mushrooms from spawn to plate takes about a month, doesn't need more space than a balcony corner, and the whole setup can be built for a few thousand rupees. The technical side — hygiene, humidity, and airflow — is genuinely learnable within a couple of cycles. The part people underestimate is the selling side: line up your buyers before you scale production, not after. Get that sequencing right, and a balcony mushroom setup can go from weekend hobby to a small, steady side income.
Comments
Sign in to comment.
No comments yet.